A coaxial connector is the joint that links an RF cable to an antenna, radio or base-station port. In the field it lives in the worst spot possible — exposed on tower tops, rooftops and mastheads. The one thing that kills it is moisture reaching the contact inside. The fix that keeps that junction dry is a cold shrink tube pulled over the connector and cable together. This guide explains why the two belong together, then how to install it.
What a Coaxial Connector Is — and Where It Sits
Coax connectors carry high-frequency signals between radios and antennas. They are everywhere RF does:
- Cell sites — N-type, DIN 7/16 and 4.3-10 jumpers on tower tops and antenna feeders
- CATV / broadband — F-type taps and drops on poles and building faces
- GPS / GNSS — small SMA and TNC antennas on vehicle, marine and rooftop installs
- DAS and broadcast — distributed antenna nodes and studio-to-tower links
The Weak Point: Where the Connector Meets the Cable
A coax connector is built to be mechanically tight, not hermetically sealed. The joint between the connector body and the cable jacket is a micro-gap that breathes as the cable heats and cools. Moisture creeps in through that gap and, over weeks, causes:
- VSWR and PIM drift — the network reads it as interference
- Corrosion of the center pin and outer conductor
- Alarms on rectifiers and base-station monitors
- Truck rolls — the most expensive item in any telecom OpEx budget
Tape and mastic buy a season. A correctly sized cold shrink sleeve is rated for years.
Why Cold Shrink Tube Is the Natural Fix
The connector's problems map directly to what a cold shrink tube does:
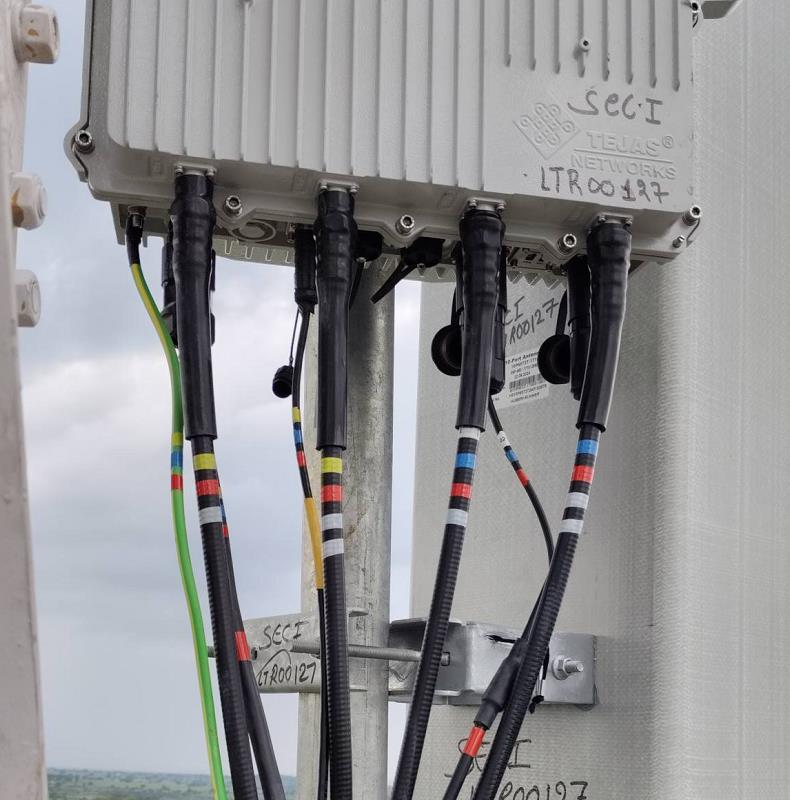
- The leak is at the body-jacket junction → one sleeve covers the connector body, the shoulder and 50 mm of jacket on each side in a single piece — no seam to lift.
- It sits next to live RF gear → install is room-temperature; no torch or heat gun to scorch the dielectric or start a fire.
- Connector shapes are awkward → the rubber shrinks to its own memory and conforms to shoulders, threads and bends where tape won't hold.
How to Weatherproof a Coax Connector (4 Steps)
- Clean & dry the jacket and connector body.
- Slide the pre-expanded cold shrink tube over the cable, past the connector, covering the whole body.
- Pull the core steadily from one end while holding the tube in position.
- Inspect — the sleeve hugs the shoulder with no daylight. A gap means wrong size.
Under 60 seconds per joint after a short learning curve.
Connector Types & VOLSUN Product Match
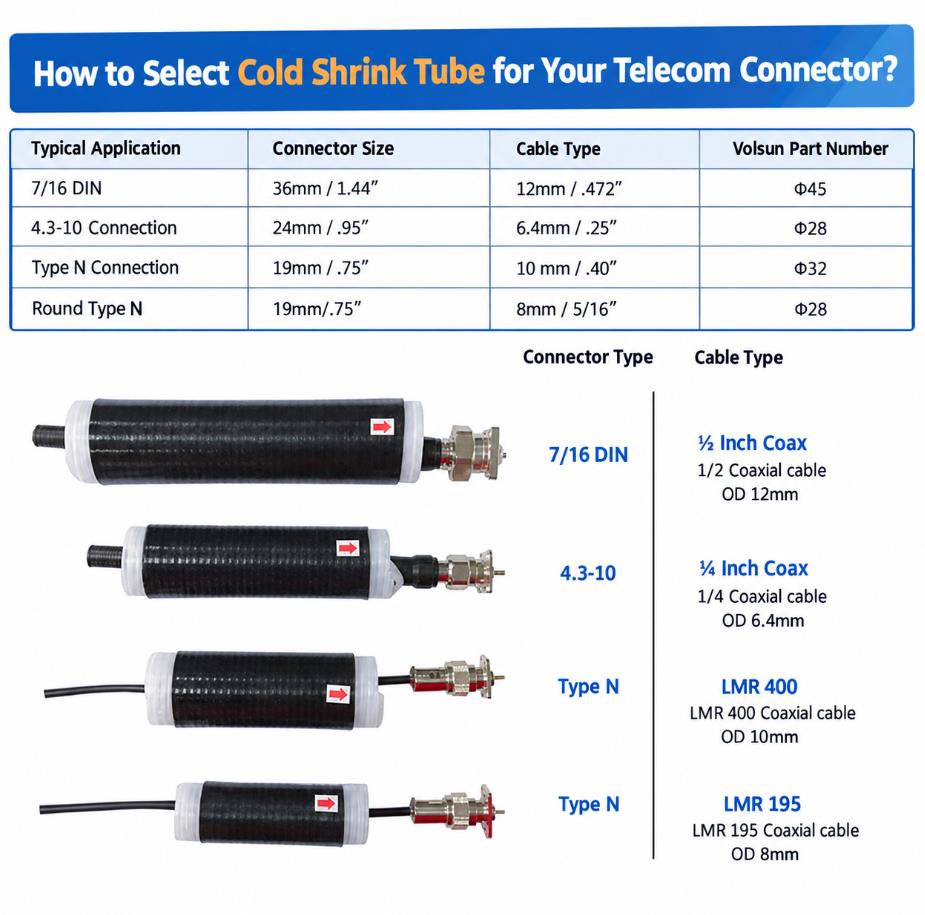
Cold shrink covers N-type, DIN 7/16, 4.3-10 connectors. Regarding the size selection, pick an expanded ID larger than the connector's largest cross-section (across the flats) and a recovered ID smaller than the jacket OD. Standard sizes cover most needs; custom dimensions are available on request.
Anyway, if your coax connectors live outdoors, seal them with cold shrink the day you install them. The cost is small against a single service visit, and the install takes under a minute.
- CONTACT TEL: +86-512-66386808
- SALES CONTACT: volsun2006@szvolsun.com